Quantcast
Channel: Govt Documents – Amazing India Blog
Viewing all 97 articles
Browse latest View live

How to Cross-Verify or Know your AO Code by PAN Card Number ?

$
0
0

PAN Card is an important Card issued by Government of India, not only it is used for financial transactions but it also acts as an Identity Proof. This Article will help you to check or cross-verify the AO Code and other details of a PAN Number. It could be your own PAN Number, your friend, client, someone from your family or anyone else. The process will not take more than 2 minutes and you will get all the details you want from the PAN Number.

Without any further discussions, Lets get Started !

How to Cross-Verify or Know your AO Code by PAN Card Number ?

In this Article, you will get to know the below mentioned details just by Entering your PAN Card Number.

  • Name and Surname
  • AO Code
  • Area Code
  • AO Type
  • Range Code
  • Jurisdiction (Ward/Circle)
  • Building Name

2 Easy Steps to Cross-Verify or Know your AO Code by PAN Card Number :

Step 1 : Click on the Link Mentioned Below to Start with the First Step :

Click here to know PAN Card Holder’s Name, Surname, AO Code, AO Type, Range Code, AO Number, Jurisdiction & Building Name

Step 2 : Enter your PAN Number and the Captcha Code & Click on Submit

AO Code by PAN Number

Check the details of your PAN Number (Name,Surname,AO Code,Type,Number,Range Code)

AO Code Details

This was the 2 Minute Process to Know your AO Code by PAN Number. If you have any queries, you can leave your comments below.

You may also like to Read : 

The post How to Cross-Verify or Know your AO Code by PAN Card Number ? appeared first on Amazing India Blog .


How to Search AO Code for a new PAN Card Application ?

$
0
0

While applying for a New Pan Card it is mandatory for the applicants to mention the AO Code in the PAN application. The applicants are advised to select the AO Code carefully. The details mentioned in the Article are as per the information received from the Income Tax Department. For more information, Applicants may contact local office of Income Tax Department in their respective city or call Aaykar Sampark Kendra on 0124-2438000.

While applying for a New PAN Card, at the beginning of the application form you will be asked to enter the below mentioned information (As shown in the Picture Below) :

  • AO Code
  • AO Type
  • Range Code
  • AO No.

AO Code Type Range

If you already have a PAN Card, you can check your AO Code in the Link Mentioned Below :

Search your AO Code by PAN Number

How to Search AO Code for a new PAN Card Application ?

Step 1 : Use the below mentioned link to know your AO Code, which you can use in your PAN Card Application :

AO Code Search for PAN

Step 2 : You can select your City by clicking on the respective alphabet.(For E.g. Click on N for ‘Nagpur’)

Select your City AO Code Pan Card

Step 3 : Lets suppose that the you are from Agra , so you need to click on ‘A’. Such a page would be visible to you where all the cities starting with Alphabet A will be listed. You need to choose Agra from this list of Cities.

City AO Code

Step 4 : Select the Appropriate AO Code from the ones listed

Agra AO Code

We would request you to read all the instructions and Do’s and Don’ts carefully while filling up the PAN Application Form.

This was the complete process to Search your AO Code by your City. If you have any queries, you can leave your comments below.

You may also like to Read : 

The post How to Search AO Code for a new PAN Card Application ? appeared first on Amazing India Blog .

DOB, Address and ID Proof Documents for PAN Card

$
0
0

DOB, Address and ID Proof Documents for PAN Card 

This Article mentions the DOB, Address and ID Proof documents required by Income Tax department of India while applying for :

  • A New Pan Card
  • Any Corrections or Changes in PAN Card/Reprint of Pan Card

Documents Required for Individual/ Personal PAN Card Application

  1. ID proof
  2. Address proof
  3. DOB(Date of Birth) proof

Also Read :

1. ID Proof Documents for PAN Card

  • Indian Passport
  • Aadhaar Card
  • Driving License
  • Voter ID/Election Card
  • Certificate of Identity in original signed by M.P.,/ MLA/ Municipal Councillor/ Gazetted Officer (As Per Annexure-A) *Original copy
  • Ration Card having photograph of the Applicant
  • Arm’s License
  • Photo Id Card (Central / State Government, Public Sector Undertaking-PSU)
  • Pensioner Card having photograph of the Applicant
  • Central Government Health Scheme Card or Ex-service men Contributory Heath Scheme Photo Card
  • Bank Certificate in original on letter head from the Branch containing the duly attested Photograph and Bank
    Account Number of the Applicant.

2. Address Proof Documents for PAN Card

  • Indian Passport
  • Aadhaar Card
  • Driving License
  • Voter ID/Election Card
  • Certificate of Identity in original signed by M.P.,/ MLA/ Municipal Councillor/ Gazetted Officer (As Per Annexure-A) *Original copy
  • Domicile Certificate ( Mool Niwas Pramanpatra )
  • Electricity Bill (Not more than 3 months old)
  • Landline Telephone / Broadband Connection bill (Not more than 3 months old)
  • Water Bill (Not more than 3 months old)
  • Gas Connection Card or book or Piped Gas Bill (Not more than 3 months old)
  • Bank Account Statement (Not more than 3 months old)
  • Depository Account Statement (Not more than 3 months old)
  • Post Office Passbook having address of the applicant
  • Credit Card Statement (Not more than 3 months old)
  • Post Office Passbook having address of the applicant
  • Passport of the Spouse (Husband / wife)
  • Allotment letter of accommodation issued by the Central/ State Govt. of not more than 3 years old
  • Property Registration Document
  • Employer’s Certificate in original in prescribed format.
  • Latest Property tax assessment order

3. DOB(Date of Birth) Proof Documents for PAN Card

  • Indian Passport
  • Aadhaar Card
  • Driving License
  • Domicile Certificate ( Mool Niwas Pramanpatra )
  • Birth Certificate (may be obtained from local bodies)
  • Pension Payment Order
  • Marriage Certificate
  • Matriculation Certificate
  • Affidavit sworn before a Magistrate of any Rank/Category

Documents for Proof of Office Address

  • Credit Card Statement carrying Office Address
  • Bank Account Statement carrying Office Address
  • Employer Certificate carrying Office Address
  • Electricity Bill carrying Office Address
  • Telephone Bill carrying Office Address
  • Depository Account Statement carrying Office Address
  • Office Property Tax Assessment Order bill (Validity should not be more than three months old on the date of application)
  • Bank Account Statement carrying Office Address

Important Point to Note

Any of the 3 Documents mentioned below serves all your 3 purposes i.e., (1) Acts as an ID Proof (2) Acts as an Address Proof (3) Acts as a DOB Proof.

  • Indian Passport
  • Aadhaar Card
  • Driving License

So, if you use any of these 3 documents you do not need to submit any other documents.

You may also like to Read :

The post DOB, Address and ID Proof Documents for PAN Card appeared first on Amazing India Blog .

List of Bank Passbook-Statement as Address Proof for Passport

$
0
0

While applying for Passport, first of all you have to get all your documents in order. One of the necessary documents while applying for a Passport is an Address Proof. For an Address and DOB Proof, you can present any documents out of documents mentioned in the link below.

Those who want to know about the name of Banks that accept a Bank Passbook/Bank Statement as an Address Proof can check for their Bank in the list given below.

List of Bank Passbook or Statement as Address Proof for Passport 

PUBLIC SECTOR BANKS

1. Allahabad Bank

2. Andhra Bank

3. Bank of Baroda

4. Bank of India

5. Bank of Maharashtra

6. Canara Bank

7. Central Bank of India

8. Corporation Bank

9. Dena Bank

10. Indian Bank

1 1. Indian Overseas Bank

12. Oriental Bank of Commerce

13. Funjab National Bank

14. Funjab & Sind Bank

15. Syndicate Bank

16. Union Bank of India

17. United Bank of India

18. UCO Bank

19. Vijaya Bank

20. IDBI Bank Ltd.

21. State Bank of India

22. State Bank of Bikaner & Jaipur

23. State Bank of Patiala

24. State Bank of HYderabad

25. State Bank of Mysore

26. State Bank of Travancore

LIST OF REGIONAL RURAL BANKS

27. Allahabad UP Gramin Bank

28. Andhra Pradesh Grameena Vikas Bank

29. Andhra Pragathi Grameena Bank

30. Arunachal Pradesh Rural Bank

31. Gramin Bank of Aryavart

32. Assam Gramin Vikash Bank

33. Bangiya Gramin Vikash Bank

34. Baroda Gujarat Gramin Bank

35. Baroda Rajasthan Kshetriya Gramin Bank

36. Baroda UP Gramin Bank

37. Bihar Gramin Bank

38. Central Madhya Pradesh Gramin Bank

39. Chaitanya Godavari Grameena Bank

40. Chhattisgarh Rajya Gramin Bank

41. Deccan Grameena Bank

42. Dena Gujarat Gramin Bank

43. Ellaquai Dehati Bank

44. Himachal Pradesh Gramin Bank

45. Jharkhand Gramin Bank

46. Jammu And Kashmir Gramin Bank

47. Karnataka Vikas Grameena Bank

48. Kashi Gomti Samyut Gramin Bank

49. Kaveri Grameena Bank

50. Kerala Gramin Bank

51. Langpi Dehangi Rural Bank

52. Madhyanchal Gramin Bank

53. Maharashtra Gramin Bank

54. Malwa Gramin Bank

55. Manipur Rural Bank

56. Marudhara Rajasthan Gramin Bank

57. Meghalaya Rural Bank

58. Mizoram Rural Bank

59. Nagaland Rural Bank

60. Narmada Jhabwa Gramin Bank

61. Pallavan Grama Bank

62. Pandyan Grama Bank

63. Paschim Banga Gramin Bank

64. Pragathi Krishna Gramin Bank

65. Prathama Bank

66. Puduvai Bharathiar Grama Bank

67. Punjab Gramin Bank

68. Purvanchal Bank

69. Saptagiri Grameena Bank

70. Sarva Haryana Gramin Bank

71. Sarva UP Gramin Bank

72. Saurashtra Gramin Bank

73. Sutlej Gramin Bank

74. Tripura Gramin Bank

75. Utkal Grameen Bank

76. Uttar Banga Kshetriya Gramin Bank

77. Uttar Bihar Gramin Bank

78. Uttarakhand Gramin Bank

79. Vananchal Gramin Bank

80. Vidharbha Konkan Gramin Bank

81. Odisha Gramya Bank

82. Madhya Vihar Gramin Bank

LIST OF SCHEDULED PRIVATE BANKS

83. Bank of Rajasthan Ltd.

84. Bharat Overseas Bank

85. Catholic Syrian Bank Ltd

86. Federal Bank Ltd

87. Dhanlaxmi Bank Ltd.

88. Jammu & Kashmir Bank Ltd

89. Karnataka Bank Ltd.

90. Karur Vysya Bank Ltd.

91. City Union Bank Ltd.

92. Lakshmi Vilas Bank Ltd.

93. Nainital Bank Ltd.

94. Ratnakar Bank Ltd.

95. South Indian Bank Ltd.

96. Tamilnad Mercantile Bank Ltd.

97. ING Vysya Bank Ltd.

98. ICICI Bank Limited

99. Axis Bank Ltd.

100. Induslnd Bank Ltd.

101. Yes Bank Ltd.

102. SBI Commercial and International Bank Ltd.

103. HDFC Bank Ltd.

1O4. DCB Bank Limited

105. Kotak Mahindra Bank Ltd.

We hope that you could find your Bank in the list of Banks mentioned above. Even if your Bank is not mentioned in the above list, you can choose from the link of Address Proof documents mentioned at the beginning of this Article.

If you have any queries or feedback, you can leave your comments below.

You may also like to Read :

The post List of Bank Passbook-Statement as Address Proof for Passport appeared first on Amazing India Blog .

What to do if your Passport is Lost or Stolen ?

$
0
0

Passport is a very essential document which not only allows you to travel Abroad but also serves as a strong Identity & Address Proof. But what if you somehow misplace your Passport, its get stolen somewhere or is damaged beyond recognition? Don’t worry, we will help you out with the complete steps to be followed if your Passport is Lost or Stolen.

What to do if your Passport is Lost or Stolen ?

Step 1 : Register an FIR for Lost or Stolen Passport

If your Passport is Lost, Misplaced or Stolen,  the first and the foremost thing you need to do is to go the Nearest Police Station and lodge an FIR (Non-Congnisable). Keep your FIR copy safely for future purposes.

If you have lost your Passport in Delhi or Mumbai, you can lodge your FIR Online. Check the below links to know how to Register Online FIR in Delhi or Mumbai.

Step 2 : Inform the RPO/PSK about the Loss of Passport

Visit the Regional Passport Office or Passport Seva Kendra from where your Passport was issued and inform them about the Loss of Passport. If you are Abroad, you need to visit the Indian Mission to report for the Loss of Passport.

Step 3 : Filling up the Passport Application Form

You need to fill the Passport Re-Issue form in order to get a New Passport in place of your Lost/Misplaced Passport.

You can follow the Procedure mentioned in the link provided below to fill up your Passport Reissue form :

Step 4 : Checking the Fee Amount and Booking the Appointment Accordingly

Normal Case

For a 36 Pages Passport,

Case 1 : If your Passport was not Expired at the Time of getting Lost or Stolen, you need to Pay a Fee of Rs.3000

Case 2 : If your Passport was Expired at the Time of getting Lost or Stolen, you need to Pay a Fee of Rs.1500

For a 60 Pages Passport, 

Case 1 : If your Passport was not Expired at the Time of getting Lost or Stolen, you need to Pay a Fee of Rs.3500

Case 2 : If your Passport was Expired at the Time of getting Lost or Stolen, you need to Pay a Fee of Rs.2000

Tatkal Case

For a 36 Pages Passport,

Case 1 : If your Passport was not Expired at the Time of getting Lost or Stolen, you need to Pay a Fee of Rs.5000

Case 2 : If your Passport was Expired at the Time of getting Lost or Stolen, you need to Pay a Fee of Rs.3500

For a 60 Pages Passport,

Case 1 : If your Passport was not Expired at the Time of getting Lost or Stolen, you need to Pay a Fee of Rs.5500

Case 2 : If your Passport was Expired at the Time of getting Lost or Stolen, you need to Pay a Fee of Rs.4000

Step 5 : Preparing the Annexure ‘L’

Visit the Notary & Prepare an Affidavit stating how and where the passport got lost/damaged (Annexure ‘L’).

List of Documents Required to be Submitted at PSK/RPO

  1. Proof of Present Address
  2. Proof of Date of Birth
  3. Affidavit stating how and where the passport got lost/damaged (Annexure ‘L’)
  4. Police report in original (FIR Copy)
  5. Self-attested photocopy of first two and last two pages, including ECR/Non-ECR page of old passport, if available.

You can follow the above procedure to get back a New Passport in place of your Lost or Stolen Passport. If you still have any doubts, you can leave a comment below.

You may also like to Read :

The post What to do if your Passport is Lost or Stolen ? appeared first on Amazing India Blog .

How to Link Aadhaar Card Number to Axis Bank Account ?

$
0
0

You may already have an Aadhaar Card and now you are looking to link it(Aadhaar Seeding) with your Axis Bank Account. You don’t have to worry now as you have landed on the right page. In this Article, we will give you 6 different options to link your Aadhaar Card to your Axis Bank Account. You can use any one of these 6 options for the seeding process.

Linking your Aadhaar Card Number to Axis Bank Account ? (Aadhaar Seeding)

1. Linking your Aadhaar Card to Axis Bank Account (Through ATM)

  • Insert your Debit Card
  • Click on Registration
  • Enter your 4 Digit PIN (XXXX)
  • Click on Link Aadhaar No. (This helps you proceed to link your Aadhaar No.)
  • Click on Select Account (Select you Account)
  • Click on Update (To Update your Account Number)
  • Click on Enter Aadhaar No. (Enter your Aadhaar Number)
  • Click on Re-Enter Aadhaar No. (Re-Enter your Aadhaar Number)
  • Click on Confirm

Selecting or Clicking on Confirm will finally link your Aadhaar Number to your Axis Bank Account.

2. Linking your Aadhaar Card to Axis Bank Account (Through Internet Banking)

  • Login to your Internet Banking account by using your Username and Password
  • Click on Aadhaar Seeding for Registration of your Aadhaar Number with your Account
  • You will be asked to Enter your Aadhaar Number to finally link it with your Account.

3. Linking your Aadhaar Card to Axis Bank Account (Through Phone Banking)

  • Call on Phone Banking Center(PBC) Toll Free Number
  • Authenticate your Account on IVR using Debit card/Customer ID
  • Please Press ‘4’ to Link your Aadhaar No. with your Bank Account
  • Please Press ‘1’ to Confirm.

‘Pressing 1’ will Confirm that you want to finally want to link your Aadhaar Number to your Axis Bank Account.

4. Linking your Aadhaar Card to Axis Bank Account (Via SMS)

The easiest way to link your Aadhaar Card Number to your Axis Bank Account is Via SMS. You just need to send SMS in exactly the same manner as given below :

Aadhaar <Aadhaar No.>AC <last 6 digits of  A/C no.> to 5676782

5. Linking your Aadhaar Card to Axis Bank Account (Through Website)

You can also use the Axis Bank Website Link given below to link your Aadhaar card to your Bank Account by entering your Customer ID and Account Number.

Link your Aadhaar Card to your Axis Bank Account Through Website

6. Linking your Aadhaar Card to Axis Bank Account (By Branch Visit)

Visit your Axis Bank Account Branch and Fill up the Resident Consent Form to link your Axis Bank Account with your Aadhaar number. Do remember to carry your original Aadhaar Card & a photocopy.

Click here to download a copy of the RCF(Resident Consent Form)

These are the 6 options by which you can link your Aadhaar Card Number to your Axis Bank Account.

You may also like to Read :

The post How to Link Aadhaar Card Number to Axis Bank Account ? appeared first on Amazing India Blog .

How to link Aadhaar Card to ICICI Bank Account ?

$
0
0

Aadhaar Card is a very important document issued by Government of India. We also need to know how to link Aadhaar Number with various services across India. You can link your Aadhaar Card to your LPG Subsidy, your EPIC/Voter Card, Your Bank Account and many other services across India.

How to link Aadhaar Card to ICICI Bank Account ? 

In this Article, we will brief you on how to link Aadhaar Card to ICICI Bank Account OR Aadhaar Seeding with ICICI Bank Account. We are going to mention 2 procedures in this article(Online & Offline) and you may follow whichever you feel is easier and faster for you.

Let’s get Started !

How to link Aadhaar Card to ICICI Bank Account ? (Online Procedure)

You can link Aadhaar Card to ICICI Bank Account by using your Internet Banking Account. If you already have an Internet Banking Account, All you need to do is after successfully logging into your Account you need to navigate exactly as shown below.

Customer Service >> Service Requests >> Bank Account Service Requests >> Account Details >> Modification Related >> Request for Updating Aadhaar Number in Savings Account

Enter your Aadhaar Details and Submit to finally link your Aadhaar Card Number to your ICICI Bank Account.

How to link Aadhaar Card to ICICI Bank Account ? (Offline Procedure)

You can also link your Aadhaar Card to ICICI Bank Account by visiting your ICICI Bank Branch. You just need to follow the step by step procedure mentioned below to link your Aadhaar Card to your Bank Account.

  1. Fill up the Form No.3 completely (Download Form No.3)
  2. Recheck every information including your Aadhaar Number & Bank Account Number
  3. Submit your duly filled Form No.3 to the concerned ICICI Branch along with the photocopy of your Aadhaar Card or E-Aadhaar. You may be asked for original Aadhaar Card as well.
  4. The Bank Official will keep your Form No.3 for verification purpose.

Once the Bank verifies your Aadhaar Details, these details will be updated on your ICICI Account Number.

You may also like to Read :

The post How to link Aadhaar Card to ICICI Bank Account ? appeared first on Amazing India Blog .

How to download e-Aadhaar Card with Aadhaar Number ?

$
0
0

This article mentions easy steps to download e-Adhaar Card by using your Aadhaar Number. There might be several reasons why you want to download e-Aadhaar Card like you may have lost your Aadhaar Card or you might have made changes to your existing Aadhaar Card etc.

How to download e-Aadhaar Card with Aadhaar Number ?

If you do not have your Aadhaar Number and you want to know your Aadhaar Number, you will need 2 details by which you can find your Aadhaar Number i.e.,

  • Name
  • Email Address / Mobile Number

Read :: How to know your Aadhaar Number by Name & Email Address/ Mobile Number ?

Now when you have your Aadhaar Number, you can follow the steps mentioned below to download your e-Aadhaar Card in Pdf format.

Step 1 : Visit the E-Aadhaar Website (https://eaadhaar.uidai.gov.in/)

Step 2 : Entering the Personal Details

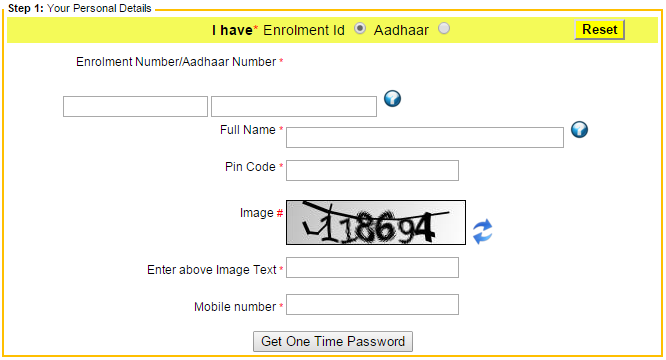
Select the Radio Button Aadhaar at the the top and enter the details mentioned in the form i.e.,

  • Aadhaar Number
  • Your Full Name
  • Area Pin Code
  • Text as appearing in the Image

E-Aadhaar Details

After entering these details, click on ‘Get One Time Password’ to get the OTP as SMS on your Mobile Number.

Step 3 : Entering the OTP and Downloading the e-Aadhaar Card

Enter OTP

Now you need to enter the OTP (Which you have received on your Mobile Number) in the field which says ‘Enter OTP’ .

As soon as you will enter the OTP, the ‘Validate & Download’ link will be highlighted and you can download your e-Aadhaar Card in Pdf format.

Note : Your Area Pin Code is the password to open your e-Aadhaar Card.

Step 4 : Taking a Printout of the e-Aadhaar Card

Now, when you have the soft copy of e-Aadhaar Card you can take a Printout of it for further use. We suggest you to take the printout on a Photo Paper which looks like the original Aadhaar Card. Do remember that e-Aadhaar is equally valid as the original Aadhaar Card.

 You may also like to Read :

The post How to download e-Aadhaar Card with Aadhaar Number ? appeared first on Amazing India Blog .


How to download e-Aadhaar Card with Enrolment Number ?

$
0
0

This article mentions easy steps to download e-Adhaar Card by using your Enrolment Number. There might be several reasons why you want to download e-Aadhaar Card like you may have lost your Aadhaar Card or you might have made changes to your existing Aadhaar Card or you may have not received your Aadhaar Card etc.

How to download e-Aadhaar Card with Enrolment Number ?

You must have a few details ready with you before downloading the e-Aadhaar Card. These details include the 3 important information from your Enrolment Slip / Resident Copy :

  • Enrolment Number
  • Date
  • Time

Once you have these 3 details ready with you, you can follow the steps mentioned below to download your e-Aadhaar Card in Pdf format.

Step 1 : Visit the E-Aadhaar Website (https://eaadhaar.uidai.gov.in/)

Step 2 : Entering the Personal Details

Select the Radio Button Enrolment ID at the the top and enter the details mentioned in the form i.e.,

  • Enrolment Number
  • Date & Time
  • Your Full Name
  • Area Pin Code
  • Text as appearing in the Image
  • Mobile Number (Used during Registration)

Aadhaar Details Enrolment ID

After entering these details, click on ‘Get One Time Password’ to get the OTP as SMS on your Mobile Number.

Step 3 : Entering the OTP and Downloading the e-Aadhaar Card

Enter OTP

Now you need to enter the OTP (Which you have received on your Mobile Number) in the field which says ‘Enter OTP’ .

As soon as you will enter the OTP, the ‘Validate & Download’ button will be highlighted and you can download your e-Aadhaar Card in Pdf format.

Note : Your Area Pin Code is the password to open your e-Aadhaar Card.

Step 4 : Taking a Printout of the e-Aadhaar Card

Now, when you have the soft copy of e-Aadhaar Card you can take a Printout of it for further use. We suggest you to take the printout on a Photo Paper which looks like the original Aadhaar Card. Do remember that e-Aadhaar is equally valid as the original Aadhaar Card.

 You may also like to Read :

The post How to download e-Aadhaar Card with Enrolment Number ? appeared first on Amazing India Blog .
How to get a Birth Certificate in Delhi ?

$
0
0

A Birth Certificate is the most important proof of your Date of Birth. Usually the details like your Name, Father’s Name, Mother’s Name, Date of Birth, Citizenship, Address etc. are mentioned on the Date of Birth Certificate.

A Birth Certificate may be prove really useful as a DOB Proof while making important documents like :

How to get a Birth Certificate in Delhi ?

One must keep in mind that every Birth has to be reported within 21 days of its occurrence whether (a) the birth has taken place in the house, OR (b) the birth has taken place out of the house.

Authorization under different cases of Birth 

(1) In cases where the birth of the child has taken place inside the house, a written letter has to be submitted by head of the house or the nearest relative of head of the house or the oldest member of the house.

(2) In cases where the birth of the child has taken place out of the house :

(a) For all births in a Hospital/Health Centre/Maternity Home etc. : A letter from the Medical In charge or any other authorized person.

(b) For all births inside a Jail : A letter by a Jail Incharge

(c) For all births inside a moving Vehicle : A letter from the Incharge of the Vehicle

(d) For all births of children found at a deserted place : Head of the Village or the Incharge of the Local Police Station

What is the Procedure to get a Birth Certificate in Delhi ?

There are some local bodies in the state of Delhi which issue the Birth Certificate. These bodies are MCD, NMDC & Delhi Cantonment Board. A Birth Certificate is issued by the respective body within 7 days of the receipt of the duly filled Application from the applicant. The Birth Certificates are issued from the concerned registration centres/Zonal Offices of the local bodies.

After the complete registration process is complete :

  • An applicant gets a Single Copy of the Birth Certificate free of cost.
  • Additional copies of Birth Certificate can be obtained by paying a nominal fee of Rs.5/copy.

Local Bodies 

There are a total of 188 centres in MCD out of which 137 Centres are Urban, 51 and Rural. There are a total of 9 Centres in NMDC and 1 Centre in Delhi Cantt.

NMDC Centres are as follows :

(1) Sub Inoculation Center, Mandir Marg
Ph: 23362284

(2) B & D reg. centre, Aurangzeb Lane

(3) Polyclinic, NDMC S.B. Marg

(4) Babar Road Maternity Center

(5) Palika Maternity Hospital

(6) 42 – south Market (Kidwai Nagar)

(7) MCW – Sarojini Nagar

(8) Charak Palika Hospital, Moti Bagh

(9) A-5 Pandara Road

Registration of Birth for Delhi Cantt. is being done at the Registration Centre located in the Cantt. General Hospital.

Where to go to register a Birth Certificate & What are the Timings ?

Where to go ? : To register a Birth of a Child, you need to visit to the office of Sub Divisional Magistrate in the respective jurisdiction where the Birth took place.

Timings : 9:oo am to 6:30 pm

Visiting Days : Any Working Day

Holidays : Public Holiday

Click on the link to : Check the location of the SDM in whose jurisdiction your Locality or Area lies 

Documents to be Submitted at the Office of Sub Divisional Magistrate

(1) Application by the Applicant or nearest Family member on a plain piece of Paper.

(2) Proof of Birth of the person whose Birth Certificate is required(PAN Card can also be submitted)

(3) An original Affidavit stating the Name, Date, Place & Time of Birth of the Person. (Download the Specimen for Affidavit)

(4) Copy of Ration Card(If available).

(5) School Leaving Certificate of the Applicant (It must show the Date of Birth).

(6) Do not forget to Attest all the above mentioned documents by a Gazetted Officer.

Criteria for late registration of Birth

(1) You can also register a birth after 21 days but before 30 days of occurrence on payment of late fee.

(2) You can also register a birth after 30 days but before 1 year of occurrence after obtaining written permission from the Registrar and on payment of late fee.

(3) You can also register a birth after 1 year of occurrence after obtaining an order from the Area Magistrate (i.e. SDM of the first class or a Presidency Magistrate) and on payment of late fee.

Fees for Birth Registration

(1) Registration of Birth within a period of 21 days of occurrence – No fees

(2) Registration of Birth after 21 days but before 30 days of occurrence – Rs.5/-

(3) Registration of Birth after 30 days but before 1 year of occurrence – Rs.10/-

(4) Registration of Birth after 1 year of occurrence – Rs.20/-

(5) Service charge of Rs.5/-

Processing & Verification 

As soon as the Application of the Applicant is received, a draft order is made and is send to the respective police station for Verification purpose. (Note : If you are providing a School Leaving Certificate then no verification will take place).

If a positive verification report is received from the concerned police station, an order is issued to the Local body for the registration of Birth. It usually takes about 21 days for getting a response from your Local Body.

You may also like to Read : 

The post How to get a Birth Certificate in Delhi ? appeared first on Amazing India Blog .

How to Apply for Marriage Certificate in Delhi ?

$
0
0

A Marriage Certificate is a documentary proof of a marriage taken place between a bride and a groom. This is the biggest legal proof of a marriage in India. The marriage certificate may prove helpful while applying for many documents. Marriage Certificate also supports the case when a woman wants to change her surname on her documents issued by Government.

Marriage Certificate can help a woman change the Surname on documents like :

  • Pan Card
  • Aadhaar Card
  • Passport
  • Voter ID Card
  • Bank Account
  • Gazette of India (Gazette Notification)

How to apply for a Marriage Certificate in Delhi ?

You can apply for a Marriage Certificate once it has taken place. There are a few documents which are required to be produced alongwith the duly signed & filled Application Form by both husband and wife.

Documents Required to apply for a Marriage Certificate in Delhi

  1. An Application form duly filled & signed by both husband and wife.
  2. Date of birth proof of both the parties i.e., Husband & Wife (Matriculation or High School Certificate / Passport / Birth Certificate). Do make sure that minimum age of both husband & wife is 21 years at the time of registration under the Special Marriage Act.
  3. A copy of Ration card of husband or wife whose area SDM has been approached for the certificate.
  4. In case of Special Marriage Act, Address Proof of the stay in Delhi of both the parties for more than 30 days (ration card or report from the concerned SHO).
  5. A notarized Affidavit is required by both the parties(husband and wife) stating place and date of marriage, date of birth, marital status at the time of marriage and nationality.
  6. Two passport size photographs of both the parties(husband & wife) and one marriage photograph(of both husband and wife combined).
  7. Marriage invitation card (Only if available, not mandatory)
  8. If marriage took place at a religious place, a certificate from the priest is required who solemnized the marriage.
  9. Affirmation that the parties are not related to each other within the prohibited degree of relationship as per Hindu Marriage Act or Special Marriage Act as the case may be.
  10. Attested copy of divorce decree/order in case of a divorcee and death certificate of spouse in case of widow/widower.
  11. In cases where one of the parties belong to other than Hindu, Budhist, Jain and Sikh religions, a conversion certificate is required from the priest who solemnized the marriage(in case of Hindu Marriage Act).

Note : All applicants must get all the documents attested by a gazetted Officer excluding receipt.

Fees to be Submitted

  • Rs. 100/- in case of Hindu Marriage Act, and
  • Rs.150/- in case of Special Marriage Act

The fees is to be deposited with the cashier of District and the receipt should be attached with the application form.

Know about Marriage Acts

A) Hindu Marriage Act

Verification of all the documents of both the parties is carried out on the date of application and a particular day is fixed and intimated to the parties for registration. On the particular day, both parties, alongwith a Gazetted Officer who attended their marriage, need to be present before the SDM. The Certificate is issued on the same day.

B) Special Marriage Act

Both parties(Husband & Wife) needs to be present after submission of documents for issuance of public notice inviting objections. Also, One copy of notice is pasted on the notice board of the office and copy of the notice is sent by registered post to both parties(Husband & Wife) as per address given by them. Registration is done 30 days after the date of notice after deciding any objection that may have been received during that period by the SDM. Both parties alongwith three witnesses are required to be present on the date of registration.

Where to go to Submit the Application & Timings ?

Where to Go ? : Both parties together needs to visit the office of Sub-Divisional Magistrate in whose jurisdiction any of the husband or wife resides.

Timings : 9.30 a.m. to 1.00 p.m. on any working day.

You can get the contact address of the SDM in whose jurisdiction in your colony lies by clicking on the link below.

Get the Contact Address of the SDM 

Download the appropriate Forms

  1. Download the Application Form for registration of marriage under Hindu Marriage Act.
  2. Download the Application Form for registration of marriage under Special Marriage Act.
  3. Download the Identification Certificate a)any person having PAN of income Tax (OR) b) any officer/official of Central or State govt. or UT Administration or PSU/Autonomous bodies whose identity can be established.
  4. Affidavit

How much time does it usually take for the complete process ?

You can usually expect response within 15 days in case of registration of marriage under Hindu Marriage Act and 60 days under Special Marriage Act.

You may also like to Read:

The post How to Apply for Marriage Certificate in Delhi ? appeared first on Amazing India Blog .

How to give Name Change Ad in Newspaper for Passport ?

$
0
0

There might be several reasons for which you want to change your name. Important point is that your changed name is only valid if you have a legal proof of it. Giving a name change Ad in a newspaper ensures a partial legal document of your name change which can be used at many places. In this article, we have given step by step procedure to give name change ad in a newspaper with sample format.

Also See :

How to give Name Change Ad in Newspaper for Passport ?

1. Selecting a Newspaper

First step to give a name change Ad in a newspaper is to select a newspaper. It is always advised to give an advertisement in a leading daily newspaper of the city or town you are living in.

Some of the leading newspapers in India are :

  • The Times of India
  • The Hindustan Times
  • Indian Express
  • Dainik Bhaskar
  • The Hindu
  • Amar Ujala
  • Dainik Jagran
  • The Hitavada
  • Mid-Day

This is only a list of few newspapers. However, you can give advertisement in a leading daily newspaper in your area. It can be an English or a Hindi Newspaper. Don’t make a mistake to give an advertisement in a lesser known newspaper.

2. Specimen for Name Change Ad (Sample Advertisements)

The newspaper Advertisement must include the following details :

  • Your Previous Name
  • Your Current Name (Changed Name)
  • Husband’s Name & Date of Marriage (In Case of Married Women)
  • Current Address (If required)
  • Date of Affidavit
  • Name of Notary

Sample Ad 1 (Without Address)

I, Abhishek Rastogi changed my name to Abhishek Singh vide affidavit dated 03-May-14, Vishal Jaiswal, Bangalore-11.

Sample Ad 2 (With Address – For Married Women)

I, Ankita Singh married Amit Singhal (on 10-04-2015) residing at C-120, Apple Tree Apartments, Fatehabad Road, Agra have changed my name to Ankita Singhal vide Affidavit dated 14-05-2015 sworn before Notary Krishan Sachdev, Agra.

3. Publishing your Newspaper Advertisement

For publishing your newspaper ad, you can either follow the offline process by visiting the newspaper office or online process by visiting the website.

Offline Process

You can visit the Office of the Newspaper for publishing the name change Advertisement. Make sure you carry the specimen for name change when you visit the newspaper office.

Online Process

You can also visit any of the websites given below to give name change ad in a particular newspaper. The process is self explanatory and the payment can be taken Via Credit Card or Debit Card.

Websites where you can give your Name Change Ad in a Newspaper :

http://www.releasemyad.com/newspaper/cat/change-of-name

http://www.ads2publish.com/categories/name-change

4. Where can you use this Newspaper Ad of Change of Name ?

You can use the newspaper Ad of Name Change as a supporting document for your Changed Name to get other documents like :

  • Passport
  • PAN Card
  • Aadhaar Card
  • Gazette Notification
  • High School Marksheet
  • Bank Account etc.

Hope the process to get your Name Change Ad published in a newspaper is clear to you. If you still have any doubts or queries, you may leave you comments below.

You may also like to Read :

The post How to give Name Change Ad in Newspaper for Passport ? appeared first on Amazing India Blog .

How to Register Online FIR in UP (Uttar Pradesh) ?

$
0
0

There might be a lot of reasons why you would want to file an FIR for a Lost Article. By using this service by UP Police, you can easily lodge an FIR without the hassles of visiting a Police Station. You may be glad to know that there are few more states in India which have implemented online FIR Service for lost articles including Delhi. You can also file an FIR Online in Mumbai.

How to Register FIR Online in UP (Uttar Pradesh) ?

Online FIR Registration in Uttar Pradesh ( Through Laptop/Computer)

Step 1 : Click on the link to Visit the UP Police Lost Article Report Page and Click on Web Version. Alternately, click on the link below.

User Registration Page for Lost Article Report 

UP Police Online FIR for Lost Article

Step 2 : Register yourself if you are a new user by clicking on New User. If you are already registered on the UP Police Website, click on Existing User.

UP Police Lost Article Report User registration

Step 3 : Enter a User Name, Mobile Number and Email ID and Click on Register to Proceed.

Note : Please enter a Valid Mobile Number and Email Address as they will be required to receive OTP(One Time Password).

New User Registration UP Police Lost Article Report

Step 4 : Now click on Register Lost Report to Register an FIR for your Lost Article or Document. You can also Click on View Registered Report to check if you ave already submitted a report before.

Important Note : False report to Police will attract penal attraction.

Register Lost Article Report UP Police Online FIR

Step 5 : Enter your Personal Details like Compainant’s Name, Son of/Wife Of/Daughter Of Name, Complete Residential Address, Mobile Number, Email ID and click on Next to Proceed.

Enter Personal Details - UP Police Online FIR

Step 6 : Enter the details of Place of Occurence i.e where the Article or Document has been Lost or Stolen.  Fill Up the Place of Occurence, District, Police Station, From Date, From Time, To Date, To Time. Also Enter the Short details(in Brief Facts) on how the Document got stolen or lost.  Click on Next to Proceed.

Place of Occurence - UP Police FIR Online

Step 7 : Enter the details of Lost Article(s). Enter the Article Lost(From the list of Articles mentioned, if the name of the article is not mentioned in the list then select others), Other Details of the Lost Article or Document(Like Pan Number for PAN Card, Aadhaar Number for Aadhaar Card etc), Article Description to describe about the article as much as possible in the space provided. If you have lost more than one article then click on Add Articles to add more articles.

Click on Submit to Submit the Lost Article Report. As soon as you click on Submit, You will receive an OTP(One Time Password) on your registerted Mobile Number and Email Address.

Lost Articles - UP Police FIR Online

Step 8 : Enter the OTP received on your Mobile Number and Click on Confirm to authenticate the report.

Enter OTP

As soon as you click on Submit, you will get Lost Report Confirmation with your Report Number.

Lost Report Confirmation

Kindly note that you will also receive a Digitally Signed copy of the FIR report on your registered Email Address in PDF Format. You can take a printout of the Loost Article Report and use it for desired purpose.

List of Articles/Documents With Information needed

Article/Document Reported Information required to be given
Aadhaar card Card No. and place of issue
Account Book Bank A/c No., Bank Name
Admit card Card No., Institution Name, Place of issue
ATM Card Bank A/c No., Debit Card No.
Bank Draft Bank A/c No., Bank Name, Place of issue
Camera Electronic Serial No., Manufacturer, Colour
Cheques Bank A/c No., Bank Name, Place of issue
Computer Electronic Serial No., Manufacturer, MAC No.
Credit Card Bank A/c No., Credit Card No.
Debit Card Bank A/c No., Debit Card No.
Driving License DL No., Place of issue
Fixed Deposit Receipt Bank A/c No.
Identity card ID Card No., Place of issue
iPad IMEI No., Manufacturer, Colour
ipods IMEI No., Manufacturer, Colour
Laptops Electronic Serial Number, Manufacturer, Colour
Mobile IMEI No., Mobile No., Manufacturer
PAN Card PAN No., Place of issue
Pass Book Bank A/c No.
Passport Passport No., Place of issue
Ration Card Ration card No., Place of issue
Tablet IMEI No., Mobile No., Manufacturer
Video camera Electronic Serial Number, Manufacturer, Colour
Others Other Details
Institutional Documents Document Name, Document ID, Place of issue
Voter ID card Voter ID Card No., Place of issue

If your document is not one of these, you can select the last option ‘OTHERS‘.

(UP Police)UPP Lost Report Android App

You can also use the Android App to register an FIR from your Android Smartphone or any other Device. Using this Online FIR Mobile Application by UP Police is quite easy. The steps are similar to the Web Version of this Service.

Download the UP Police Lost Report Android App

You may also like to Read : 

The post How to Register Online FIR in UP (Uttar Pradesh) ? appeared first on Amazing India Blog .

How to book Online Appointment for Aadhaar Card Enrolment ?

$
0
0

You might be looking to book Online Appointment for Aadhaar Card. Don’t worry in this article we will tell you how to fix appointment for Aadhaar Enrolment online? In our previous articles we have already discussed about how to change aadhaar card name and address  and the process to change aadhaar card mobile number and dob .

Currently, the Online service for booking an appointment for Aadhaar Card is available for trial basis for select States/UT. These States are Andhra Pradesh, Bihar, Chandigarh, Delhi, Gujarat, Haryana, Himachal Pradesh, Jharkhand, Karnataka, Madhya Pradesh, Maharashtra, Punjab, Rajasthan , Telangana, Uttar Pradesh & Uttarakhand. On successful results from these states, this service can be available for other states as well.

How to book Online Appointment for Aadhaar Card ?

Step 1 : Getting to the ‘Appointment for Aadhaar Enrolment’ Page

First of all you need to visit the Aadhaar Appointment Page.

Step 2 : Filling up your Personal Details

Aadhaar Appointment Personal Details

As soon as your reach the Appointment for Aadhaar Enrolment Page, you will need to fill up your personal details like :

  • Full Name
  • Email Address
  • Mobile Number
  • Number of Persons

Step 3 : Selecting your Location & Enrolment Centre for Aadhaar Appointment

Aadhaar Appointment Select Enrolment Centre

Once you fill up your personal details, you need to Select the following from the drop down menu :

  • State/UT
  • District/City
  • Locality/Area
  • Enrolment Centre

You can also check the Availability of Slot at your Aadhaar Enrolment Centre by clicking on Check Availability as soon as you enter the above mentioned details.

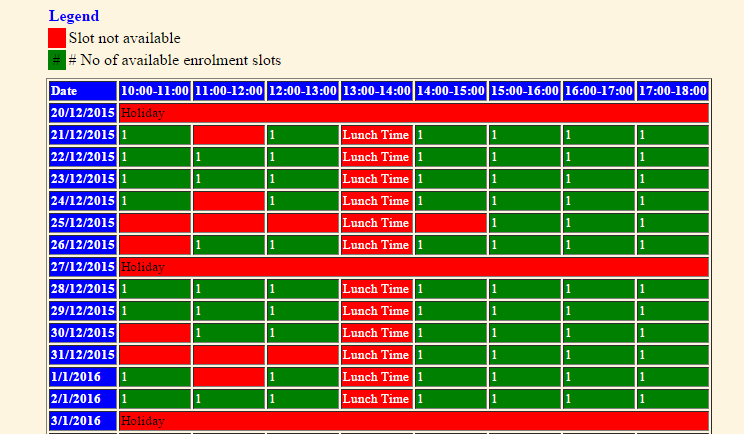
Aadhaar Appointment Date and Time Availability

Step 4 : Selecting Date & Time for Aadhaar Appointment and Booking the Appointment

Aadhaar Appointment Select Date & Time

Once you have filled up your Enrolment Centre and Location Details, you need to finally select the Date and Time of Appointment. Do enter the Verification Code as it appears above the box.

Click on Fix Appointment to Finally Book the appointment.

As soon as you click on Fix Appointment, You will be able to see your Token ID, Centre Location details(With Address), Date and Time of Enrolment, No of Persons for whom appointment has been fixed, Contact person at the enrolment centre, Registrar Name & Enrolment Agency. You will also receive an SMS with all these details.

You may also re-schedule/cancel your appointment. Do remember to carry Proof of Identity(POI), Proof of Address(POA) and Proof of DOB(DOB) while going at your enrolment centre. You can download and print the Pdf format of your Aadhaar Enrolment form and carry it along with you to save some time.

Hope you liked to know how to fix an online appointment for Aadhaar Card Enrolment. You may leave your comments below if you have any queries.

You may also like to Read :

The post How to book Online Appointment for Aadhaar Card Enrolment ? appeared first on Amazing India Blog .

How to reschedule Online Appointment for Aadhaar Card ?

$
0
0

You might be looking to Reschedule Online Appointment for Aadhaar Card. Don’t worry in this article we will tell you how to reschedule appointment for Aadhaar Enrolment online? In our previous articles we have already discussed about how to fix online appointment for aadhaar enrolment and the Steps to change aadhaar card Name or Address.

Currently, the Online service for booking, rescheduling and cancelling an appointment for Aadhaar Card is available for trial basis for select States/UT. These States are Andhra Pradesh, Bihar, Chandigarh, Delhi, Gujarat, Haryana, Himachal Pradesh, Jharkhand, Karnataka, Madhya Pradesh, Maharashtra, Punjab, Rajasthan , Telangana, Uttar Pradesh & Uttarakhand. On successful results from these states, these services can be available for other states as well.

How to reschedule Online Appointment for Aadhaar Card ?

Step 1 : Getting to the ‘Aadhaar Enrolment Appointment Reschedule’ Page

First of all you need to visit the Aadhaar Apointment Reschedule Page.

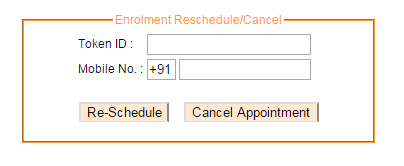
Step 2 : Entering Token ID and Mobile Number & Rescheduling Appointment

Now you need to enter your Token ID which you got after fixing your aadhaar appointment. Also, enter the Mobile Number which you entered while booking your aadhaar card enrolment appointment.

Click on Re-schedule to reschedule your aadhaar card enrolment appointment.

Reschedule Aadhaar Appointment

Step 3 : Selecting Date & Time for Aadhaar Appointment and Rescheduling the Appointment

Aadhaar Appointment Select Date & Time

Once you have filled up your Enrolment Centre and Location Details, you need to finally select the Date and Time of Appointment. Do enter the Verification Code as it appears above the box.

Click on Fix Appointment to Finally Fix the appointment.

As soon as you click on Fix Appointment, You will be able to see your Token ID, Centre Location details(With Address), Date and Time of Enrolment, No of Persons for whom appointment has been fixed, Contact person at the enrolment centre, Registrar Name & Enrolment Agency. You will also receive an SMS with all these details.

You may also re-schedule/cancel your appointment. Do remember to carry Proof of Identity(POI), Proof of Address(POA) and Proof of DOB(DOB) while going at your enrolment centre. You can download and print the Pdf format of your Aadhaar Enrolment form and carry it along with you to save some time.

Hope you liked to know how to reschedule an online appointment for Aadhaar Card Enrolment. You may leave your comments below if you have any queries.

You may also like to Read :

The post How to reschedule Online Appointment for Aadhaar Card ? appeared first on Amazing India Blog .


How to cancel Online Appointment for Aadhaar Card ?

$
0
0

You might be looking to cancel Online Appointment for Aadhaar Card. Don’t worry in this article we will tell you how to cancel appointment for Aadhaar Enrolment online? In our previous articles we have already discussed about the steps to fix online appointment for aadhaar enrolment and how to reschedule Online Appointment for Aadhaar Card.

Currently, the Online service for booking, rescheduling and cancelling an appointment for Aadhaar Card is available for trial basis for select States/UT. These States are Andhra Pradesh, Bihar, Chandigarh, Delhi, Gujarat, Haryana, Himachal Pradesh, Jharkhand, Karnataka, Madhya Pradesh, Maharashtra, Punjab, Rajasthan , Telangana, Uttar Pradesh & Uttarakhand. On successful results from these states, these services can be available for other states as well.

How to cancel Online Appointment for Aadhaar Card ?

Step 1 : Getting to the ‘Aadhaar Enrolment Appointment Cancellation’ Page

First of all you need to visit the Aadhaar Appointment Cancellation Page.

Step 2 : Entering Token ID and Mobile Number & Cancelling Appointment

Now you need to enter your Token ID which you got after fixing your aadhaar appointment. Also, enter the Mobile Number which you entered while booking your aadhaar card enrolment appointment.

Click on Cancel Appointment to reschedule your aadhaar card enrolment appointment.

Reschedule Aadhaar Appointment

As soon as you click on Cancel Appointment, your Aadhaar Enrolment will be cancelled. You will also be notified about the same via SMS indicating that the appointment made under that specific token id has been cancelled.

In future, at any point of time you can again plan to book an appointment online and can apply for aadhaar card enrolment. We wish this service gets implemented for all the states in India soon.

You may also like to Read :

The post How to cancel Online Appointment for Aadhaar Card ? appeared first on Amazing India Blog .

How to Register on Passport Seva Portal ?

$
0
0

How to Register on Passport Seva Portal ?

You might be looking to know how to register on passport seva portal or how to do passport seva registration. Don’t worry this post will help you to register on Passport Seva Portal. Every Citizen in India should have Indian Passport as it is the biggest proof of Citizenship. The Offline process to apply for Passport is really time consuming and out of date. So, with time the Ministry of External Affairs have started the Online Procedure for Passport applicants.  Nowadays, people follow the Online Procedure for applying for Indian Passport. You must not entertain any Agents for this purpose. This is a simple procedure which you can follow by yourself and would just Cost you Rs.1500 whereas agents could charge you anywhere between Rs.6000-Rs.10000 or even more. If you have DOB, Address and NON-ECR Proof for passport, you wont have any difficulty in getting a passport.

So, lets get started with the process to register on Passport Seva Portal.

apply passport online in india

Step 1 :  First of all you need to reach the Passport Seva Website. Go to Google and type Passport Seva, click on the first link & you will reach the Passport Seva Website. Alternatively, click on Go to Passport Seva Website.

Step 2Click on Register Now at the left hand side. You will be directed to a User Registration Form.

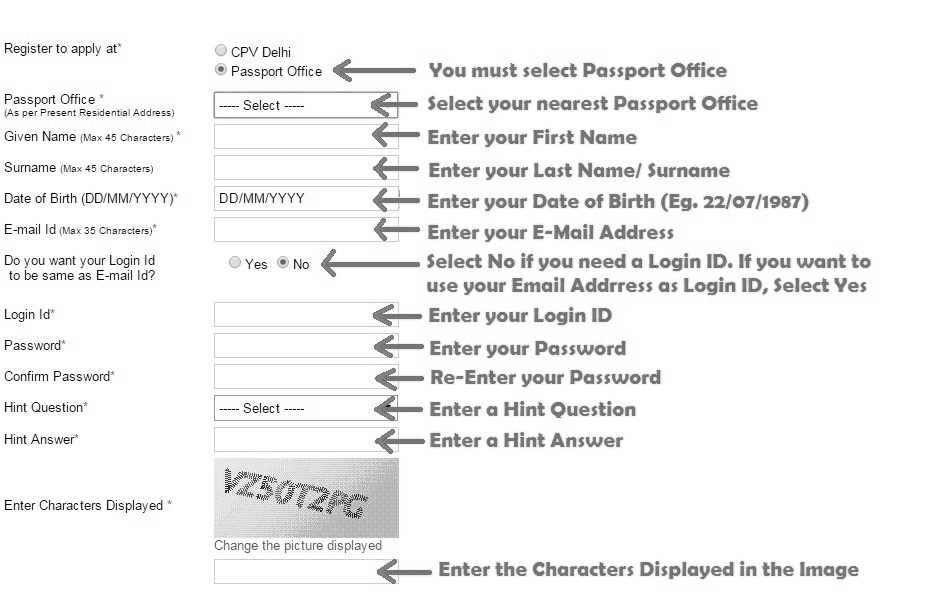
Step 3 : User Registration form will look like the one given belowFill this User Registration Form as described below and Click on Register. As soon as you will click on Register, you will be registered on Passport Seva Portal. You can use these credentials on passport seva registration login page for the services mentioned.

How to Register on Passport Seva Portal

After completing the User Registration, you will reach the Applicant Home Page. Here you need to Click on the desired link to use further services.

Hope that after reading this article, you can easily register on Passport Seva Portal. If you still have any doubts, you can leave you comments below.

You may also like to Read : 

The post How to Register on Passport Seva Portal ? appeared first on Amazing India Blog .

How to book Online Appointment for Passport ?

$
0
0

If you are want to know how to book online appointment for Passport, you have landed on the right page. In this Article we have described the complete process for online passport booking. In our previous articles we have already discussed about how to apply for a fresh passport online in India and important documents required while applying for passport. Now let us know how to take an online appointment for passport or the process of booking online appointment for Passport. This process can be used while applying for a fresh passport or renewal/re-issue of passport.

In this Article, you will know the process of :

  • Passport Appointment Booking (With Online Payment)
  • Passport Appointment Booking (With SBI Bank Challan)
  • Cancelling/Rescheduling Passport Appointment

How to book Online Appointment for Passport ?

Before we move ahead, we would like to tell you few important things which you must keep in mind before you book an appointment for passport.

(1) Important Points for Passport Appointment Booking

  1. As per the new process Appointment date & time will be automatically allotted by the system depending upon the availability of appointment slots at the desired PSK.
  2. Prior payment of passport service fee has been mandatory for booking appointments at PSKs. So do not forget to check your fee before proceeding with the appointment procedure.
  3. You can easily make the payment using the Online Payment feature introduced through the Passport Seva Online Portal.
  4. An applicant will be able to cancel or reschedule the appointment at the PSK only twice within one year of first appointment date.
  5. Do keep in mind that you will not be allowed to book online appointment for that ARN once two reschedule options are exercised or first appointment was scheduled more than one year ago.

(2) Passport Appointment Booking Process (With Online Payment)

You need to pay applicable passport service fee in advance which has been made mandatory for booking appointments in all Passport Seva Kendras.

Online payment for Passport service fee can be done using one of the following payment modes:

e-Payment Modes:

  • Internet Banking (through SBI and associate bank accounts only i.e. State Bank of Patiala, State Bank of Hyderbad etc.)
  • Debit Card (Visa and MasterCard only)
  • Credit Card (Visa and MasterCard only)

Challan Payment Mode:

Bank Challan (payable at SBI branches in India only)

2(A) Passport Appointment Booking Process (With Internet Banking)

You will have to perform the following steps for payment through the Internet Banking payment mode:

  1. First you need to Register through the Passport Seva Online Portal and create the User Id.(Read : How to Register through the Passport Seva Portal ?)
  2. After that, you need to Login with the registered User Id.
  3. Now Click the Apply for Fresh Passport/Reissue of Passport link below the Services section.
  4. Generate an ARN under the Normal or Tatkaal scheme either by filling the Passport Application form Online or by uploading an eForm.
  5. Schedule an appointment by clicking the Pay and Schedule Appointment link or Schedule Appointment link (if you have already made the payment) on the View Saved/Submitted Applications screen. Do remember that the Pay and Schedule Appointment link will be available only if the applicant has not made any payment for booking appointment. As soon as you click on this link, two options will be displayed on the screen: (a) Online Payment (Internet Banking, Debit Card, Credit Card) (b) Challan Payment (Pay in Cash at SBI Branch). Do keep in mind that the Schedule Appointment link will be available only if applicant has made payment but appointment is not booked.
  6. From the 2 options available, Select Online Payment option and click the Next >> button to move to the next screen.
  7. Select the ‘Appointment Quota’ (Normal/Tatkaal) as per your application.
  8. Select the preferred PSK(Passport Seva Kendra) for appointment booking.
  9. The next available appointment date will be displayed on the screen for the selected PSK. After verifying each and every detail, click the Pay and Book Appointment button to navigate to the Multi Option Payment System (MOPS) of SBI’s website. Do remember that the MOPS screen will be displayed only when appointment is released for the selected PSK under the desired appointment quota.
  10. Now, Select NET BANKING as the mode of payment by selecting SBI or any other SBI associate bank(Like State Bank of Patiala, State Bank of Hyderabad etc.). Login using the Internet Banking User Id and password of your State Bank Account to make Online Payment of passport service fee.
  11. Now, you need to Login through the Internet Banking screen to make Online Payment of passport service fee.
  12. Once you have successfully made the payment, you will be redirected to the Passport Seva Online Portal.
  13. You will now see the Appointment Confirmation screen along with appointment details.
  14. Finally, Click the Print Application Receipt button to print the Appointment Receipt. The application receipt contains the details of the payment made and the Payment Reference Number as a proof of payment. Do keep this receipt safely as this will be required when you visit the PSK.

2(B) Passport Appointment Booking Process (With Debit/Credit Card)

You will have to perform the following steps for making payment Via Debit/Credit Card payment mode:

  1. First you need to follow the 8 steps i.e. Step 1 to Step 8 of above Section 2(A) Internet Banking to navitage to the MOPS website of SBI Bank. Do remember that the MOPS screen will be displayed only when appointment is released for the selected PSK under the desired appointment quota.
  2. Now, you need to Select CARD PAYMENTS as the mode of payment by selecting the desired Debit or Credit Card payment option. You can select from the list of Cards which are accepted to make payment.
  3. After that the Applicant will have to provide necessary card details like Card Number, Name on Card, PIN, CVV, 3-d Secure Code etc.
  4. Once the payment has been made successfully, applicant is redirected to the Passport Seva Online Portal.
  5. Appointment Confirmation screen is displayed along with appointment details.
  6. Finally, Click the Print Application Receipt button to print the Appointment Receipt. The application receipt contains the details of the payment made and the Payment Reference Number as a proof of payment. Do keep this receipt safely as this will be required when you visit the PSK.

2(C) Passport Appointment Booking Process (With SBI Bank Challan)

If you are applying for any of the passport services (Fresh Issuance/Reissue of Passports/IC/PCC) Online through the Passport Seva Online Portal you have an option of making application fee payments at SBI branches through a system generated Challan. You need to take a printout of the system generated Challan and submit it at a nearby SBI branch along with the application fee in cash.

Note : Please note that the Payment will be reflected after at least 2 working days of depositing the application fee in the SBI branch. You can only try booking PSK appointments once the Payment Status is displayed as ‘Success’ in the system.

You will have to perform the following steps for payment through the Challan payment mode:

  1. First you need to follow the 4 Steps i.e., Step 1 to Step 4 of Section 2(A) Internet Banking to navigate to the View Saved/Submitted Applications screen.
  2. Schedule an appointment by clicking the Pay and Schedule Appointment link or Schedule Appointment link (if you have already made the payment) on the View Saved/Submitted Applications screen. Do remember that the Pay and Schedule Appointment link will be available only if the applicant has not made any payment for booking appointment. As soon as you click on this link, two options will be displayed on the screen: (a) Online Payment (Internet Banking, Debit Card, Credit Card) (b) Challan Payment (Pay in Cash at SBI Branch). Do keep in mind that the Schedule Appointment link will be available only if applicant has made payment but appointment is not booked.
  3. Now Select the Challan Payment option and click on Next >> button to move to the Make Payment screen.
  4. After thatm you need to Click the Generate Challan button to generate an SBI Bank Challan.
  5. Do remember to take a printout of this SBI Challan and deposit it along with the fee amount (in cash) at any of the SBI branch in your city during banking hours. After you desposit the amound, SBI official will enter the fee payment details in the system. A Transaction ID (Bank Journal Number) will be generated and noted in both copies of the Challan. One copy of the challan will be kept by the bank and the other copy(duly stamped and signed by bank official) will be returned to the applicant. Your ARN details printed on the Challan will be validated by SBI and the Payment Status will be updated in the Passport Seva system after at least two working days.
  6. This process will update the Passport Seva Online Portal regarding Payment Status of the Challan. Once the Challan has been realised, Applicant will be notified by an e-mail regarding the actualisation of the Challan.
  7. You can also track the status of the Challan using the Track Payment Status screen.
  8. As soon as your Payment Status is confirmed as ‘Success’, you will receive an e-mail (if e-mail ID has been provided while filling application form) to book a PSK appointment. You need to navigate to the View Saved/Submitted Applications screen and click on the Schedule Appointment link to schedule or book an appointment at the desired PSK.
  9. After that you need to Select the ‘Appointment Quota’ (Normal/Tatkaal).
  10. Select the preferred PSK for appointment booking.(Nearest to your Place)
  11. Finally, you need to Click the Book Appointment button. An Appointment Slot (if available) will be booked automatically for the selected PSK(Passport Seva Kendra). Appointment confirmation screen with appointment details will be displayed.

3. How to Cancel/Reschedule Passport Appointment ?

You need to perform the following steps for cancelling or rescheduling an already booked appointment:

  1. First you need to Click the Schedule Appointment link on the View Saved/Submitted Applications screen.
  2. Then click on the Reschedule Appointment/Cancel Appointment button. You will also be able to see a confirmation message displaying the count of reschedule/cancel attempts left.
  3. If you are rescheduling the appointment, do select the preferred PSK(Passport Seva Kendra) and click the Next button.
  4. After checking the available appointment date displayed for the preferred PSK, you need to click on the Book Appointment button. An appointment (if available) will be automatically be booked for the selected PSK and previously booked appointment for the ARN will automatically be cancelled.
  5. Finally, the Appointment Confirmation screen is displayed with the Print Application Receipt button which can be used to print the application receipt.

This is the complete process to book online appointment for Passport. If you have any feedback or queries, you may leave your comments below.

You may also like to Read :

The post How to book Online Appointment for Passport ? appeared first on Amazing India Blog .

How to Check Passport Status ?

$
0
0

How to Check Passport Status ?

After applying for a Passport in India, there are 2 ways to check the status of the Passport. If you have applied for a fresh/new passport or renewed your current passport, you will receive your passport within 6 weeks from the date of application. If you have applied for a Passport under Tatkal scheme, you should be able to receive your Passport within two weeks from the date of application. If you are willling to know status of your passport, you can follow any one of the following options given below.

(1) Checking Passport Status Online

You can check your Indian passport status online by visiting this link –> http://passport.gov.in/. Once you visit this site, you need to Select your Application Type as Passport/PPC/IC and enter the Reference File no. (which is your Application Number) and select your DOB(Date of Birth) mentioned in your passport application. As soon as you enter the required details and click on Track Status button, the status of your passport will be displayed to you.

(2) Check Passport Status through Phone

You also have the option to check your Indian passport status by calling respective passport office or PSK. The phone numbers of the respective Passport Office or PSK is also available on your application form. Do remember to note down the phone numbers before submitting the application form. You can find the telephone numbers of all the Passport Seva Kendra and Regional Passport Offices Online in India. Once you call the respected passport office give your application number for reference to know your current status of the passport.

Also Read :

Best practice is to take a photocopy of your passport application form before you finally submit it. You may need the photocopy if your passport is getting delayed or to know your passport status.


The post How to Check Passport Status ? appeared first on Amazing India Blog .

Indian Passport Enquiry

$
0
0

Indian Passport Enquiry 

If you are willing to apply for a new Indian Passport or your passport is lost/damage/stolen or your passport is about to expire then you need to contact the concerned RPO governed by Ministry of External Affairs, Govt. of India for Indian Passport Enquiry. Enquiries about Indian Passports issued from India or from any other place in the world can be made at Regional Passport Offices (RPO) located at 35 cities in India.

For Online Enquiries

To make simple enquiries like How to apply for Indian Passport? Where to apply? Fees structure of Passport, Tatkal Scheme you can visit the official site of Passport India –> http://passportindia.gov.in/ for online enquiry. You can also know the status of your passport once applied for.

Contact Details of Regional Passport Offices for Enquiries

Ahmedabad RPO

Opp. L.D. Engg. College Hostel, Gulbai Tekra, Ahmedabad-6.
079-26309103/04,26300603,079-26309118
rpo.ahmedabad@mea.gov.in

Amritsar RPO

SCO No110, RajTower Dist Shopping Centre,
Ranjit Avenue,
0183-2502104,0183-2502108.
rpo.amritsar@mea.gov.in

Bangalore RPO

RPO 80 Feet Road, 8th Block, Koramangala, Bangalore.
080-25706100/ 6101/ 6102/ 25781506, 080-25706124
rpo.bangalore@mea.gov.in

Bareilly RPO

BDA Building Nainital Road Izatnagar, Bareilly-243001.
0581-2546041,0581-2543250
rpo.bareilly@mea.gov.in

Bhopal RPO

Gangotri Complex 2774277,
2nd Floor, TT Nagar,
Bhopal-462003.
0755-2774278, 0755-2774276
rpo.bhopal@mea.gov.in

Bhubaneswar RPO

A-17/12, Surya Nagar, Unit VII,Bhubaneswar-751003.
0674-2533831/2393991, 0674-2394005
rpo.bbwr@mea.gov.in

Chandigarh RPO

SCO–8-32,Sector-34-A,
Chandigarh-160022.
0172-2606889, 0172-2601863,
rpo.chandigarh@mea.gov.in

Chennai RPO

26 Haddows Road,
Shastri Bhavan,
Nungambakkam,
Chennai-600034.
044-28203592/593/594
044-28252767
rpo.chennai@mea.gov.in

Cochin RPO

Passport Office Building,
Panampilly Nagar PO.,2312607
Cochin-682036.
0484-2314041,2315152, 0484-2310915
rpo.cochin@mea.gov.in

Dehradun RPO

12 New Road, Aroma Hotel, Dehradun.
0135-2652165,2652162, 0135-2652161
rpo.dehradun@mea.gov.in

New Delhi RPO

Hudco Trikoot-3,
Bhikaji Cama Place,
R.K.Puram,
New Delhi-110066.
011-26166292/011-26165870
rpo.delhi@mea.gov.in

Ghaziabad RPO

Passport Officer,CGO Complex, Hapur Chungi,
Ghaziabad.
95120-2721779, 2721876 95120-2782770 rpo.ghaziabad@mea.gov.in

Guwahati RPO

RPO Rani Bagan,
Basistha Road,
3rd Byelane,
Guwahati-781028.
0361-2260101,2264841, 0361-2260101
rpo.guwahati@mea.gov.in

Hyderabad RPO

D.No 8-2-215 to 219
Kummarguda, Secunderabad-500003
040-27715333/27716149/ 040-27705656
rpo.hyderabad@mea.gov.in

Jaipur RPO

J-14 Industrial Area Jhalana Dungri,
0141-2702515,2710884,2221250 0141-2710219 rpo.jaipur@mea.gov.in

Jalandhar RPO

2nd & 3rd Floor Ambika Tower, Police Line Road, Jalandhar.
0181-2223278,2223274,2452601, 2225991 0181-2236567
rpo.jalandhar@mea.gov.in

Jammu RPO

Actg. PO Aukaf Trust Bldg Gandhi Nagar Jammu-180004.
0191-2433359,2451085,2223278 0191-2435279 rpo.jammu@mea.gov.in

Kolkata RPO

Actg. RPO 4 Brabourne Road,Kolkata – 700001.
033-22254893, 22254084 033-22254762 rpo.kolkata@mea.gov.in

Kozhikode RPO

Bye Pass Road, Ernhipalam PO, Kozhikode-673006.
0495-2768869/2769139 0495-2765470 rpo.kozhikode@mea.gov.in

Lucknow RPO

RPO Nav Chetna Kendra,
10 Ashok Marg 22,
Lucknow-226001
0522-2287125,2287126, 0522-2287129
rpo.lucknow@mea.gov.in

Malappuram RPO

Intercity Arcade,
Down Hill, Post 273703/2739704
Malappuram-676519
Kerala
0483- 2739701/2739702/ 0483-2739705 rpo.malappuram@mea.gov.in

Mumbai RPO

Manish Commercial Centre,
216-A, Dr. Annie Besant Road, Worli, Mumbai.
022-24932699, 24931731,249355, 022-24935275rpo.mumbai@mea.gov.in

Nagpur RPO

CGO Complex, B Block, Saminary Hills, Nagpur(MS) 440006.
0712-2510646 0712-2511740
rpo.nagpur@mea.gov.in

Panaji RPO

Passport Bhavan,
13-A, EDC Complex,
Patto Plaza,
Panaji, Goa-403001.
0832-2437601,2437602, 0832-2437603
rpo.goa@mea.gov.in

Patna RPO

D-Block,Maurya Lok Complex, Patna.
0612-2223267,2227943. 0612-2227972
rpo.patna@mea.gov.in

Pune RPO

MSFC Building, 270 Bhamburda, S.B.MargOpp. Symbiosys College, Pune.
020-25675421-22,25679962/ 25675419, 020-25679961
rpo.pune@mea.gov.in

Raipur RPO

Sector-4, Pt. Deen Dayal Uppadhyay Nagar, Raipur.
0771-2263921/2263922 0771-2263923 rpo.raipur@mea.gov.in

Ranchi RPO

E-59, Sector-II,
HEC colony,
PO Dhurwa,
Distt. RANCHI,
Jharkhand.
0651-2443608, 0651-2442840
rpo.ranchi@mea.gov.in

Shimla RPO

PO Railway Board Building, IInd Floor, Shimla.
0177-2808942, 2658648, 2652395 0177-2658648
rpo.shimla@mea.gov.in

Srinagar RPO

Hotel Lake Breeze,
Boulevard Road, Srinagar.
0194-2452405,2451193, 0194-2451224
rpo.srinagar@mea.gov.in

Surat RPO

APMC Market,
Poona Kumbharia Road, PO Dumbhal, Surat.
0261-2331861-862, 0261-2331863
rpo.surat@mea.gov.in

Thane RPO

Vardhan Building, MIDC, Thane.
022-25837803/ 022-25829434
rpo.thane@mea.gov.in

Trichirappalli RPO

RPO, W.B.Road, Trichirappalli.
0431-07203-04/ 0431-2707515
rpo.trichy@mea.gov.in

Trivandrum RPO

SNSM Building,
Karalkada Junction,
Kaithamukku,
Trivandrum-695024.
0471-2460132 0471-2461132
rpo.trivandrum@mea.gov.in

Visakhapatnam

43-11-20/ABC, Subbalakshmi Nagar,
Visakhapatnam-530016,
Andhra Pradesh.
0891-2745746,2745747 0891-2745748
rpo.vizag@mea.gov.in

The post Indian Passport Enquiry appeared first on Amazing India Blog .

Viewing all 97 articles
Browse latest View live